Showing posts with label Bread. Show all posts

Friday, May 14, 2010

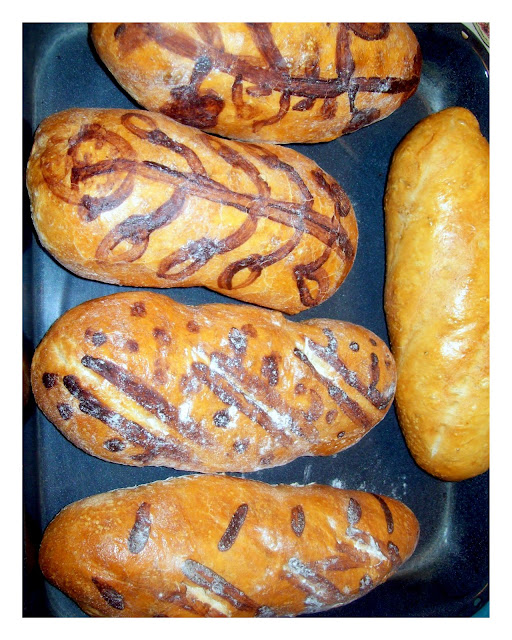
Bread Painting

  Bread is becoming a big passion to me; I always search for new recipes, and bread techniques, to improve my skills. Artisan Breads are one of my favourite, I love toasted crunchy bread... I prepared my Artisan bread dough yesterday and let it rest in the fridge overnight, and this afternoon I used the dough to do some sandwich breads and an asparagus pie which I will post later.
Couple of days ago I spotted a nice painted bread at La Table de Nana http://latabledenana.blogspot.com/2009/05/painting-bread-101.html/ then from there I ended at Chef Tess posting about her bread painting techniques http://cheftessbakeresse.blogspot.com/2009/06/basic-bread-painting-technique.html/ check her site and see the wonderful breads she makes.
ne thing I need to add, my bread making is improving a lot, but oh my I do need to work on my painting skills. I had so much fun this evening with making my bread. I used ½ tsp of cocoa + ½ tsp coffee diluted in tsp of water then added some egg yolks, seems my mix was a bit on the runny side side, and the color came darker than expected. Its okay for a first trial, I need to do more practicing to master the technique.  I leave you with some photos


Friday, May 7, 2010

My thanks to you

I want to take the chance to thank all my good friends who inspired me through their food and recipes Mary of One Perfect Bite, Angie of Angie’s Recipes and Isabelle of Les Gourmandises d’Isa.  Also I like to add my thanks to the authors of the Artisan Bread in five minutes a day for their recipes.   Here are some of the baking photos I made for the Shows.


French Puff Breads & Flat Breads
Inside the bread
Chocolate Babka - Recipe from Mary
Maple Cranberry Bread - Recipe From Angie

French Puffed Bread
Apricots,Dates & Spices Bread


Walnut Bread
Flat Bread with fruit and spices
Raisin Cinnamon Bread


Cinnamon Buns
Ninety Cinnamon Buns and 15 Raisin Breads (Brioche Base dough- Recipe Artisan Bread Book) and 20 breads were sold in less than 1.30 minutes
Nightingale Nests Baklawa
Meat Pastries - Meat Borek
Roasted pepper Bread

My favourite
These were in my two fridges for three days total of 25 bags


Maple Caramel Bars - Isa


Maple fudge with White Chocolate -  Isa

Wednesday, March 17, 2010

Hokkaido Milky Buns and new Bread Technique

As you know I am always in search of new bread recipes and more new techniques and when I saw Angie’s recipe for Hokkaido Milky Buns, I knew immediately that I have to try this recipe and the new technique, which is called Tangzhong Starter, which is cooked roux starter.

The Tangzhong Starter is a mixture of one part flour and five part of water by weight, cooked for couple of minutes to bring out the gelatinization of the starch in flour. What makes the bread baked with this kind of starter difference is Starch Gelatinization, which helps to engage more water, namely more water will be absorbed, to provide characteristic softer, more elastic-textured bread. Moreover, the bread will have long-lasting freshness.

Tangzhong Starter - Angie's Recipe here

50 g Bread flour

250 ml Water

In a bowl, whisk together the water and the flour until the mixture is well blended and lump free. Stir the mixture while it cooks over the medium heat to reach 65C/150F. It takes about 2-3 minutes.

Remove from heat and cover loosely with plastic wrap to prevent from drying. Store the starter in the refrigerator after completely cooling down. To use the starter, measure out the amount called for in a recipe and let it warm to room temperature. Unlike sourdough starter, this special Tangzhong starter doesn't improve its flavour with age. So it's preferably to use up in 3 days.

Hokkaido Milky Buns or Loaf


300 g All-purpose flour

50 g Rye flour

30 g Milk powder

120 g Tangzhong-Water Roux Starter

55 g White sugar

14 g Fresh yeast or three teaspoons dry yeast

5 g Salt or one tsp

1 Egg

30 g Milk

50 g Crème Fraiche/or sour cream

30 g Soft butter, diced

Preparation

Place all other ingredients, except butter, in the mixing bowl with a dough hook and stir over the low speed until the ingredients incorporate. Adjust speed to medium and continue to beat. When a dough ball starts to form, cut in the butter. Low down the speed to knead until the butter has blended into the dough. Increase the speed to medium again and knead until the dough has become very smooth and elastic.

Shape the dough into a ball and transfer into a large greased mixing bowl. Roll it around so the dough gets coated with oil. Cover the bowl with plastic wrap or damp cloth. Let rise until doubled in bulk, about 1 hour. Punch down the dough to release the gas produced during the proof and divide it into 3 even portions, each about 240 grams. Round up and let rest for 15 minutes.

Press out the gas of each dough and roll out into an oval shape. Fold it into thirds, overlapping them in the center, press the dough down firmly. Turn over and roll out into a 30-cm long strip. Turn over and roll up each to a column shape. Or you can divide the dough into 12 portions and shape each into a ball. Place them in a 30x11x8-cm loaf pan. Let the dough rise up to 2/3 full.

I turned the dough into 6 buns and rolled them like small baguettes and buns and double brushed the face with egg wash to give them a deep golden color.

My note: preheat the oven at 450F and when its ready put the baking tray in and lower the heat to 350F , it’s a trick I learned it by myself, and it works great in anything you are baking… the bread will take around 30-35 minutes …

All I can say, that I baked the bread around 11 pm last night, and I couldn’t resist the smell coming from the kitchen and I can hardly wait to have a bite of this bread. It was

Hot, amazingly delicious, spongy with layers and layers of spongy dough, taste like a rich brioche … I truly encourage you to try this bread and this new technique, Still have half of the starter in the fridge and iam going to try another recipe with it.


Tangzhong Starter

I wish you can smell this bread


Source: http://angiesrecipes.blogspot.com/2009/02/hokkaido-milky-loaf-buns.html

Thank you very much my friend for a great bread recipe... I am trying another one.


Wednesday, February 17, 2010

Mankousheh or Oregano Bread

The Humble Mankousheh
Out of the Oven


Ready for the Oven


Ash Wednesday, in the Western Christian Calendar, is the first day of Lent and occurs forty-six days (forty days not counting Sundays) before Easter.

For the first day of Lent I want to offer a simple recipe from the Lebanese Kitchen which is easy to prepare , tasty, full of nutritious ingredients, an energy booster. It's a breakfast staple, great for lunch , wonderful as a snack, and amazing any time of the day... This is my weakness.. The Humble Mankousheh.... which is bread dough stuffed either with Zaatar Mix and then it's called Mankousheh Zaatar (Oregano Bread) or stuffed with Cheese and its Mankousheh Jibneh or stuffed with meat and its called Lahem BiAjeen or Sfeeha.

In every corner of every neighbourhood in Beirut, you will find a Manakish Bakery; they open with the first light of the day, to prepare their dough, to be ready with the first customer entering their doors. During breakfast rush hour, all the bakeries are busy. On the weekend you have to have a ticket specially if some ladies, bring their own Zaatar mix to make their own Manakish at the bakery; you will ask for some dough and they give it to you rolled on a wooden board, one beside the other, as much as you want, when you finish stuffing your bread, they will bake it for you . Some ladies even bring Zaatar and cheese mix or meat mix for Lahem Bi Ajeen or Sfeeha. This is how much we love our Manakish burning hot out of the oven, served with fresh mint leaves, some black olives and slices of tomatoes.

You will have a nice treat , If you get to taste Mankousheh done on the Saj, which is a metal disk burns either on wood or Propane Gas. My mom has a Gas Saj she bought it to make our daily lavash bread during the war . Our treat at the end of a bread day; baking some nice hot Mankousheh on the Saj. On some weekends we used to invite our neighbors in the building for Manakish breakfast with Zaatar and Cheese accompanied with a cup of warm tea.
Because my mom is a farmer's daughter, she is used to prepare all the food specially the Mouneh from scratch (Mouneh is the larder that comprises foodstuff preserved in the ancient tradition for th winter season, and I am her daughter) which includes making the Zaatar Mix... which till now I find it the best mix I have ever tasted...her secret is adding some toasted nuts to the wild thyme/oregano , sumac , toasted unshelled sesame seeds, she also adds toasted chickpeas, and sometimes toasted pistachios or peanuts....and she ground them all in a big stone mortar and pestle...

I do get my share from her amazing Zaatar mix. She became friends with a spice mill place in our area, she takes some Zaatar to Sami the owner to package the Zaatar in a sealed bag from his Mill... this way if she is travelling or sending it with someone... she will not have any problem at the customs... Smart!

To prepare the best Mankousheh, you must have a good quality of Zaatar mix, good quality of Olive Oil, I like the Greek Olive Oil, because its very close to our oil, most of all a good dough, because if you don't have a good dough, all the above will not matter.

Dough:
when making my dough I use Sourdough Starter:
1 cup starter, with 2 cups of warm liquid (combination of water and 1/2 cup olive oil)
4 cups of unbleached flour, one teaspoon of dry yeast one tsp salt and tbsp of sugar....
the dough needs to rest and take its time to double... be patient and don't ever rush your dough
a cup or so of a sponge dough. Sometimes you need to add some more flour or more liquid , it all depends on the climate , the flour brand and your sponge.

When the dough rise and double, I take around a big ball and put in a freezer bag, to use it the next time I make another bread dough.
Zaatar Mix: Can be purchase from any Middle Eastern/Lebanese Store and you mix it with olive you to a spreadable Constancy to cover your dough... If the mix is too thick the Mankousheh will be dry and if the mix is too runny from the olive oil it will run out of the dough and burns before the bread is baked.


My weakness


A Treat from mom


Greek Olive Oil or Italian


Mom Zaatar Packaged in Sami Bittar's Spice Bags

Good in children lunch boxes


This is how I introduced the Manakish @ the Farmer's Market the first year..Now they all want the real Mankousheh.


Note: Mankousheh is a single Oregano Bread
Manakish is the plural of Mankousheh


Friday, January 29, 2010

Bread Dough - Three flavours - part 3

For someone who does her own bread, and everything from scratch, I always in search for the best of the best, either in baking or cooking, and sometimes the keeper recipe, is not good any more . Test is part of the job, playing with the ingredients and the formula to take it to the higher level.

One of the things I am always trying are bread recipes, for sandwiches. My husband works in construction and I make sure that he has a good lunch and dessert in his lunch box every day.

My bread usually is based on a sourdough recipe...I love crusty bread, on the other hand my husband always complain about his crunchy dry bread, where I find myself whipping kind of luncheon salad to stuff his sandwich and make it more appetizing softer to eat.

A good Pain Au Lait bread is hard to find in North Bay, where I am used to good bread in Beirut, also my mom, makes good lavash (markouk Bread - from her I learned to do everything from scratch) its easy to find this bread in almost all the bakeries in Beirut.
I tested several recipes, some were good, but turned dry after several days.

Last week I was checking the Mennonite girls can cook blog and I stumble upon a good bread recipe called Lydia's White Buns, the recipe is rich like a Brioche Dough, but not overly rich that you cannot use it as a sandwich bread . I was very excited and had to give it a try.

I prepared a batch last night and made Michel a sandwich, and guess what, the lunch box was in the truck all day, with -27C temp outside, the sandwich survived the harsh cold weather, and stayed spongy , soft and Michel was extremely happy, he said this is the best sandwich bread he has so far.... Am I happy or what !!!!

Lydia's White Buns Bread
makes around 15 buns
2 cups of milk
2 large fresh eggs
1 1/2 tsp of salt
1/3 cup sugar
1/4 cup butter + 1/4 cup of shortening I used lard as I don't use vegetable shortening
1/2 cup warm water
1 tsp sugar
2 tbspt of yeast
6 cups of flour i used unbleached

step one: add the sugar and the yeast to the warm water dissolve and let it foam and rise.
step two: heat the milk , add the butter and lard and the sugar, stir to dissolve, and when it cools add the eggs and stir.
step three: add the yeast to the milk mixture which will cool, so it will not kill the yeast, stire then add it to the flour mixture and knead to get a nice smooth dough. Cover and let it rise for 90 minutes to two hours.
step four: punch the dough down when it rise. Let it rest again for 10 minutes, prepare your pans by either spraying them with oil, or using a parchment paper . you can oil your hands and grab a piece the size of a grapefruit then with the right hand squeeze the dough with your thumb and forefinger to get a ball the size of a mandarine, (i divided the dough into 7 buns and 8 small loaves and rolled each on the table to get a smooth round surface) cover and let the dough rest again... at least an hour and if more the better.
(I brushed the top with egg wash and sprinkled sesame seeds and poppy seeds this is optional)
Step five : bake your buns in a preheated 350F oven, I warmed the oven at 450F and when it was ready I lowered the heat to 350F and baked the buns until golden brown


Thursday, January 28, 2010

Bread Dough - Three flavours

Sunflower Sourdough Bread I


During the time when I was preparing the flower roses for the "cookies for peace event", I made my sourdough and let it rest. When I baked the cookies, I was thinking about a flower bread , and how I can create a flower with a yeast dough.

I came with the idea of doing a sunflower bread made with three layers and when it rise it will turn to a nice flower shape....

I have to admit this is my first time doing this, took some photos and wanted to share the step with you, maybe you will come with a more creative way to add to the steps:

A Sunflower Sourdough Bread

what you need is a sourdough or regular bread dough cut and shaped into three balls
an aluminium pie plate to hold the cut leaves
a sharp knife


who can resist a warm bread out of the oven


Step one: roll the first ball into a circle and make six cuts from inside out leaving 1/2 inch board
Step two: bring the pie plate closer to you, place the cut circle inside the plate, leave the border at the bottom edge of the plate , then flip each leaf inside out , so that the leaves are resting on the edge of the plate and the top of the plate is the support for the leaves when they rise.

Step three: take the second ball and place it in the centre.


Step four: roll the third ball into a circle and cut it into six leaves, similar to the first step, and insert it around the centre ball, making sure that the leaves when they open will be next to the first and not on top of it... you can adjust the position so they open next to each other to create the flower leaves shape. Cover and let the bread rise and double in size....


Bake in a preheated 425F oven with a water bath either in the bottom shelf or the top shelf, to create humidity, or you can sprinkle your bread with water....